Correcting data
Introduction
Sometimes, you can face a situation where your data has outliers, i.e. data that are abnormal because of local dysfunctions. The data were acquired, but their value are not normal. In such case, you can wish to
purely remove columns / rows / bands,
correct particular dead pixels by replacing their value by correct ones.
For the dead pixels, their new value are set to a mean over the nearest correct sampled positions.
In the below example, the user wants to remove the red rows, the green columns and correct a dead pixel in blue.
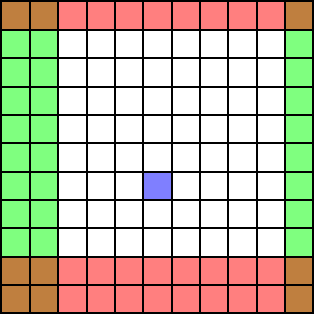
Correction with a single image
Correcting data manually
This is realized easily by using the correct() method of the data object. This only requires
slices objects that define the rows and columns to keep (and the bands in case of 3D data),
the position of dead pixels.
Note
Let us recall what a slice object is. When you define a numpy array A of shape (m, n), you can access columns and rows using e.g. A[1:2:5, :2]. In each direction, you specify the start, stop and step values.
For example, writing A[1:, :] mean you want to select all rows from row 1 to the last row m. This is equivalent to write A[slice(1), :]. In fact, a slice object just defines, for a direction, the start, stop and step values. Let’s have some examples:
1:is equivalent toslice(1),:10is equivalent toslice(None, 10),::10is equivalent toslice(None, None, 10),2:10is equivalent toslice(2, 10),:is equivalent toslice(None).
For the above example, one should write the following code.
>>> data
<Stem3D, title: Test, dimensions: (|11, 11), sampling ratio: 0.20>
>>> data.correct(rows=slice(1, 9), columns=slice(2, 10), dpixels=[6*11+5])
Correcting STEM acquisition...

>>> data
<Stem3D, title: Test, dimensions: (|8, 8), sampling ratio: 0.20>
Correcting data with the configuration file
A lot of information can be given to inpystem through the configuration file. To pass correction info to the load functions, all you need is to define slices inside the corresponding 2D DATA or 3D DATA sections. For this, use the following keys: rows, columns, bands and dpixels. The slice should be written as for numpy array selection (1:-60). Let’s illustrate is with the configuration file of the HR-sample example image.
[2D DATA]
file = spim4-2-df-manualy aligned image.dm4
columns = 15:-60
dpixels = [9384, 8468]

[3D DATA]
file = spim4-2_ali.dm4
columns = 15:-60
bands = 90:
dpixels = [9384, 8468]
Note
Contrary to the correct() method which allows slices, the configuration files require literal slices such as 1:-50.
One other main difference is that slices objects do not accept negative values while the configuration files values are parsed and accept negative values. As a consequence, to tell inpystem you just want to keep all rows but the first one and the five last ones, you should write slice(1:m-1) (where m is the number of rows) for the correct() method while the configuration file would accept 1:-5.